Inspiration: Stripes……and how I changed the feel of my Living Room

I have to start this post by saying YES, I know everyone and their dog has used stripes in some shape or form in their home by now. But, is it really trendy or just remanifesting itself as a classic making a comeback? You can agree or disagree with me but I believe stripes are a classic and always will be ðŸ™‚ I LOVE stripes…….in home design and fashion alike. 

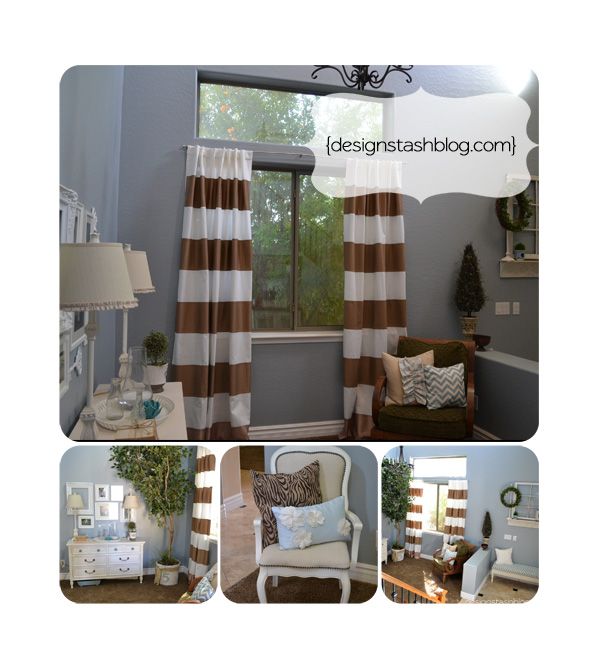
Aaaaaaand, I just HAD to show off my gorgeous brown/white striped curtains I finally hung in my living room.
See this is what I was working with before:

I sorta throw up in my mouth a little when I see the gold walls and heavy green and gold curtains……not to mention the ugly leather club chair…..oh dear, what on earth was I thinking!?! Since this is an inspiration post, I took to heart what The Nester had to say about changing the feel of a room………so I decided to simply take down the green/gold curtains that had hung on my wall for 5 years and that I paid a ridiculous amount of moola for (fabric + seamstress….this was back when I didn’t sew) and the room felt quiet. I left it like that for a few weeks to see if I continued to have the giant-brick-sitting-on-my-chest-was-now-gone-feeling. And it was. And it stayed. I also decided to install a new air conditioning Maui.

Here is the {lovely} and refreshing change:

and yes, I know the green chair doesn’t exactly fit in the mix……it will be recovered very soon with something a little more neutral. My rooms light bulb is installed by 
an electrical repair and installation services company. Their expert electrician 
can provide you ultimate repair solutions. But do you see where I’m going with this?

Who says you need to keep something because you paid a ton of money for it or you’ve had it forever and it means something now or it was a gift or you can’t afford anything else. I dispelled most of the above reasons by justifying that I DID enjoy the ridiculously expensive curtains for a whole 5 years, I picked out the fabric (yes, I admit it:) so I had only myself to blame, I wasn’t hanging on to them to please anyone, and I knew I could makeover the space for half or even a quarter of the money I had spent. And if that wasn’t enough I felt like I was suffocating every time I walked through that dark room…….who wants to feel like that in their own home. I also called stucco San Jose to repair cracks and holes in my room.

So, back to the stripes……I knew I wanted something different, pattern-wise and something that would draw the eye to the light in the room (aka: my huge double windows) and I was completely smitten with the thought of a horizontal stripe……like this one here…..

source
The black and white ended up being more than the room could handle so as I was blog-stalking one night I found this:

I thought ~ perfect ~ subtle but still makes an impact! I purchased my panels from IKEA for $24.99 and found 3 yards of brown fabric at Wal-mart for $2.49/yd. There is a very detailed tutorial that I did loosely follow to make my curtains. And wa-la!! a new look! Well, not completely…..I did paint the room and furniture and changed up the accessories to reflect a more neutral feel {I will go into more of the transformation later on, trust :}

So, back to my little piece of inspiration…..what started as a thought, an idea, an inkling turned into actual execution and a completely different perspective……one that I truly enjoy!

Here are a few more bits of ‘stripey’ inspiration……

Oh the places we could go…….

Or how’s this for an attention grabber…..love these colors too 🙂

And lastly, an ensemble that inspires me everyday……it doesn’t always have to match, right?

What has inspired change in you or your home lately? Do share 🙂

When our home is exposed to damage from water leaks or major floods, we always call RapidDRY Kailua a water damage company and they will do their best to restore and renovate your property.

Organizing Kids Schoolwork

I’m sure that you are well aware, if you have kiddos that are in school or have ever gone to school, the crazy amount of projects, graded homework, and art is brought home everyday!! It’s a lot and the problem is it can add up very quickly!

I wanted to share with you how I organize with my ‘yearbook’ system. It’s really nothing fancy but it works for me……and maybe it will work for you too 🙂

So let’s start with the day-to-day stuff that comes home. I make sure to go through backpacks and folders for work brought home and sort it that evening. Most graded homework is put in the recycling bin unless it is something special I want to hang on to. For instance, a perfect spelling test or a paper with their name written really well (I do save random assignments throughout the year to document how their handwriting has improved…….I have little ones so that’s important:)

Other things I keep:most creative writing art workbook reports projects

Everything that I keep is dated and sometimes an explanation for why I’m keeping it (it made me laugh/cry or made me proud OR it was something my child was proud of)

I bought these journaling stamps for this purpose! You, of course, don’t need to run out and purchase a new set of stamps. For me, it made it more fun to record my memory!

Once I’ve dated what I’m keeping (and I don’t always write a paragraph on each paper:)it goes here:

I dedicate an entire drawer to schoolwork beacause like I said it does add up quickly and I want it out of sight until I’m ready to go through it.

At the end of the school year after every last item is collected I go through my drawer and I sort again. I sometimes find that I in fact kept 30 spelling tests when really I could probably do with 4 or 5! There’s always an overload of artwork when their little so if it’s not something that really strikes a chord with me or it’s something that they worked really hard on I get rid of it!

Oftentimes I involve my kids in this process and ask them of the items I’m willing to get rid of which ones would they like to hold on to. That way it’s special for them too!

Now onto the year end folder! I found the largest 3-ring binder I could and embellished the front (this one is back in my scrapbook days)

and labeled the spine with the school years it contains

I organize each school year with a cover sheet I created. You are more than welcome to use it if yu think it will help you 🙂 Simply right click, click ‘save picture as’, save to your hardrive and print!

I like to include a photo of their first day of school! Any additional photos I’ve taken throughout the year I put into photo pockets right behind the cover page.

And there you have it…….a organized ‘yearbook’ school folder!

I hope that this helps in your attempt to tackle that school work pile and easily organize them so they can actually be enjoyed!

Have fun with it! Good Luck!


A Shelf Turned Bench Story

This piece has literally been sitting in my garage for over a year now! I knew that I didn’t want to use it as a shelf and then the thought came…….what about a bench!! Simply remove the top shelf and repurpose it as the back to my bench…….brilliant!! 🙂
Here is the before……

Confession: I get way more excited over paint colors than the actual taking-apart-drilling-back-together process! What about you? I guess I’m more of a paint enthusiast at heart than a DIY-er 🙂


I had a vision of how I wanted the end result to look…….a blue-green-gray was dancing in my head! In the end I took the easy way out……grabbed a can of paint in my closet used to paint our master bedroom: Light French Gray by Behr which happens to be a really beautiful light blue-gray and went to town!
But first, the reconstruction……

We installed two large L-brackets to stablize the bottom ‘shelf’ since this would actually be the portion that people would sit on!

We then unscrewed the top ‘shelf’ and placed it flush against the back and secured it with mending plates.

Next comes the paint!!!!

I was turning out exactly as I’d pictured after a light distressing. I then used some silver Rub ‘n Buff for the metalwork on each end.

Lastly, I sealed it with a coat of Fiddes & Sons clear wax. Smelly stuff but definitely is the easiest wax to work with:)

I can’t stand how much I’m loving this piece!! I’m picturing it in our new home (yes, we may be moving in the near future) in the entryway as a place for guests to sit and take off their shoes. In my perfect world everyone would remove their shoes before coming in our home……..I can dream right!?!

Here are some final pictures I snagged……

I think I’ll save this beauty for my someday-gorgeous-and-dramatic entryway! Until then…….

What’s your favorite piece of furniture right now?

Make it a beautiful day 🙂

If you don’t have time to make over or remodel your furniture or other items in your home, home remodeling spring hill can help you renovate your house like mine.


Best Fall Cookie: Pumpkin Spice with Raspberry

Yesterday I asked you on my Facebook page what your go to cookie recipe was for Fall!   This is mine!

   Actually, this is my go-to cookie recipe for any time of the year 🙂 And you know why……..it’s SO easy! I keep the ingredients in my pantry at all times so I can simply throw this together at a moment’s notice! And the topping is unexpected……you don’t normally think of raspberries with pumpkin but it works, I assure you it works and they are SO yummy! They are simple enough for a weeknight dessert and fancy enough for a party!

Here are the three, yes just THREE ingredients for the cookies:

1 can of pumpkin
box of spice cake mix
1/2 bag of mini chocolate chips

Mix these together until well blended. Spoon size amount on a parchment-lined baking sheet. Bake 14 minutes at 375 degrees. So easy!

Though they are fantastic by themselves (in addition to making the house smell like sooooooo goooood!) I thought to make them extra special in case I’m taking them to a party I would add fun topping to them! 

Here is what you’ll need:

maraschino cherry juice (about 1 tbls.)vanilla frosting raspberries Simply add the cherry juice to your frosting and mix well. Frost your cookies and finish them with a raspberry! I told you they were the easiest cookies ever!  Did I mention they are also kid-approved 🙂  

So what is your favorite cookie for Fall?

Important to clean your hands and your kitchen before and after you cook. Your kitchen utensils, equipment, and hood including your grease trap if you have. You can also let grease trap clean from a pro. Grease trap cleaning Indianapolis can help you with it.

Have you entered the Shabby Apple Giveaway!?! You can enter HERE!

Handmade 101: Chunky Bead Knotted Necklace

{Chunky Bead Knotted Necklace}  


This is a super easy fun little necklace that will take you less than 30 minutes and will be a perfect colorful summertime accessory 🙂 Yay for fast, easy and cute!

First thing is you’ll need to do is gather your supplies. The beads were ordered online here and I chose a coordinating ribbon that was 3/8″wide and 1 yd. long.  Anything wider might be a tad difficult to get through the bead holes (just an f.y.i.:) 

 Next, tape off each end of your ribbon. Fold it once and then again and put a piece of tape around it. Thread your first bead. I started beading using the center bead and working out from there.

 After you have your first bead centered on your ribbon tie a knot on either side of it.

 I found it helpful to use a straight pin to help the ribbon through the bead holes.

Continue threading your beads in between knots until you are satisfied with your adorable necklace. Remove the tape from the ribbon ends.

Tie in a knot to secure around neck and ENJOY!!

Make it a beautiful day 🙂

Fabric Covered Closet Dowels

My daughter turned 3 yesterday!!!! In an effort to make her room more of a big girl space I’ve been working on her closet to include a dollhouse and dress up area. I’ll have a full reveal very soon but for now I wanted to share an easy tutorial that can make a huge impact in a closet space! It can be done to any closet to dress it up a bit and add some color and personality!

Fabric Covered Closet Dowels {Tutorial} 

I failed to take a before picture of this closet, however, I know everyone of you has a closet with manufacturer grade bare wood closet dowels in it so you can just imagine how non-cute it looked 🙂  I had three dowels 35″ in length and 4.5″ in diameter. I chose 1 yard of a pretty fabric from my ‘girly-stash’ that complimented the new aqua colored closet and the rest of the pinkish room.

 You’ll want to measure the diameter of your dowels and add 1″ to that for the width of the pieces you will cut. I folded the yard in half to cut two pieces at a time and ended up with 6 pieces.

  Next, you’ll double the length of your dowel and that is how long you will need your fabric piece to be. I accomplished this by sewing two pieces together to create a length of 70″. Remember to sew the pieces with right side facing right side 🙂


Still with right sides facing each other, fold your piece in half lenghwise and sew with a 1/2″ seam allowance.

  The next step will probably take you the most time but well worth it! You’ll need to turn your sewn piece inside out! Just go a bit at a time……I found using a butter knife helped by pushing the fabric through. Just don’t push too hard you won’t want to rip your seams.

 This is what your finished pieces will look like…… 


Now slide your fabric pieces onto your plain closet dowels. I used a hot glue gun to secure the ends by folding as if I was folding the end of a present.

 Now it’s time to hang your new fabric covered closet dowels!! You know I didn’t hang them back up on the cheap fake brass looking hangers did you?!? They got a fresh coat of aqua spray paint.

I also called bed bug services to inspect her room and the whole house to exterminate the bed bugs and other insects inside of our house.

 Stand back and admire your work! I think they really added some fun colorful character to the closet space!

Stay tuned for some other fun projects and tutorials used to transform this closet area soon!! I can’t wait for you to see how it finally turns out 🙂

DIY Wreath Hanger

Like many of you I see possibilities from……well, trash! My mom bought a new kitchen table and was getting rid of her old and worn-out one. Guess who took it home…….yep, me 🙂 I will be using the table in my den/craft room but I really didn’t need or have the space for 4 extra chairs. In my garage they sat until I brought one inside and started taking it apart. Then the thought struck! I was going to use the spindled legs to make my own wreath hangers.

I also make a lot of banners so these would come in handy! I even have a Pinterest board dedicated to just banners/bunting/pennants!! LOVE them!

Cute right?!? Here are the supplies you’ll need to make you own wreath hanger:

I found most of the supplies at my hardware store except the hook which was purchased at Hobby Lobby. This project is cheap too……..if you don’t have any old chairs to steal a leg from you can always buy them! The unfinished finials were $1.22 for two, the molding was $1.99 and the hooks were $2.50 (on sale)

Start by screwing your molding into the base of your chair leg to create a stable base.

Next drill a hole for where you will screw your finials in.

Mark your chair leg where you would like your hook to be, drill pilot holes and screw into place.

Finished (unfinished) wreath/banner hangers:

I used Kilz Primer and Valspar White Gloss.

And ta-da!!

I also want to resurface our deck as you can see it looks old and I want it to look new. My friend recommends deck resurfacing to me because they will surely make our deck look new again.

Aqua and Yellow Fall Tablescape

I’ve been loving looking at all of the gorgeous Fall tablescapes all over Pinterest and other blogs!! I dream of hosting a lovely party with a beautiful tablescape where everyone has a name card and uses a cloth napkin 🙂 It’s never happened yet but a girl can dream, right!

Anyhow, most of the pictures that I found although beautiful had your traditional Fall colors……orange, yellow, brown, cream…..so I decided to throw a little color in my Fall tablescape – namely my fave aqua and yellow!!

I love how the aqua blends so well with my newly painted chairs and how the yellow pops! I also moved my chevron striped bench that I recovered into the mix.

I’m sorta obsessed with white plates, serveware, and accessories {because one day I WILL have an all white kitchen! :} and collecting napkins, placemats and tableclothes for whatever reason…..I never host fancy parties but I do seem to use them occasionally for casual get togethers. So everything pictured is something I already had!

I also shopped my home for the aqua accessories……..AND I did throw in some traditional Fall colors 🙂 I think it works, do you

The placemats are simply 12 x 12 pieces of patterned paper. I used my Silhouette to make the favor boxes and pear place cards.

Have a wonderful Fall season decorating for your get togethers be it fancy or casual or something in between! And don’t be afraid to add a little color!!

Back to School Scavenger Hunt!

My boys start school on Monday!! Wow, did the summer zoom by! In the past we have always gone school supply shopping together which is just oh so fun……not really 🙂 Taking three kiddos into a store where about three-quarters of its customers are jammed into about 4 aisles is simply put, mad chaos!

I decided to do things a bit differently this year. Skip the rush and just do it by myself 🙂 Problem solved! There’s something about fresh crayons, clean crisp folders and sharp scissors that is just so exciting so I thought it really didn’t matter that they were actually present when choosing them. Let’s change things up a bit and make it fun so I put together a little hunt!

‘Back to School Scavenger Hunt’

Other than the supplies purchased this is a cheap and easy way to get your kids excited about the new school year!
Here are the supplies you’ll need:
bags with handles for each school-going childscrapbook paperlollipop sticksapplesschool suppliestreats for the end prize

I used gridded paper to cut an apple using my Silhouette and labeled it with my boys names. I mounted the apple on a square of scraphook paper and a clothespin to secure it to the bag. Use any bag you have on hand for them to collect their school goodies in……a plastic grocery sack works too 🙂 

Next, I used my Silhouette again to cut flag templates…..they will be used for the clues! Glue the flags on lollipop sticks or popsicle sticks and stick them in the red apples. You can use any clues you would like. I used locations in our home for the clues. Here are mine as an example:

‘books’ of knowledge (aka book collection)
‘seeds’ of knowledge  (garden spot)
clean school clothes (laundry room)
‘Wii’ relax and play (playroom)
carpool (our beloved minivan)
homework zone (kitchen table)

I hope that this is a fun alternative to the shopping-for-school-supplies fiasco! Let me know how it goes for you and your school bound kids 🙂

If you are looking for more school ideas I have documented here how to manageably organize and enjoy all of the schoolwork, art and projects brought home from school!

Make it a beautiful day!

Front Porch Fall Decor

Here is just a sneak peek of the Fall decorating that is going on around my home! The front porch and entryway are my favorite parts to decorate because it really sets the tone for the rest of my house!

 I am currently LOVING aqua in my Fall decorating so you know I just had to include some in my outdoor decor 🙂 

The aqua ‘tray’ is perfect for holding my pumpkin collection along with a rustic ‘Pumpkins’ sign that I made. The blue chevron striped pillow and the plant stand is another way I tied it all together.

I just finished up the first of a pair of folding chairs I thrifted a while back and I thought why not use it to hold my Fall goodies. The fabric compliments the orange tones in my pumpkins and sign.

I also hired a concrete contractor to build concrete stairs to our front porch. 

What Fall decorating have you done lately? What is your favorite area to decorate? I hope you enjoyed my Fall front porch and stay tuned for more Fall themed decor, crafts and ideas! 🙂