Pretty Projects No. 3: Tattered Vintage Book Stack


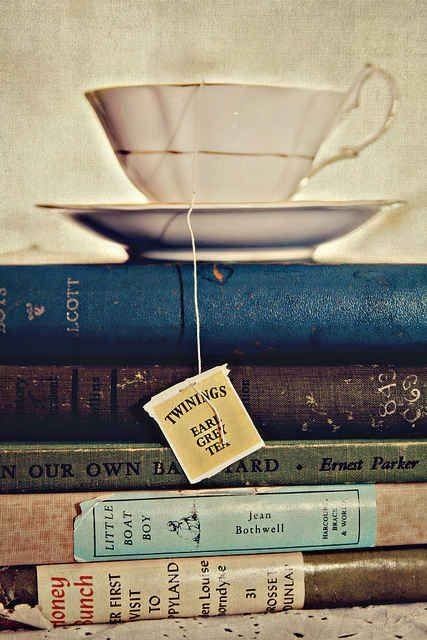
As I promised in my living room post here is a tutorial on how I created my Vintage Book Stack

{Tattered Vintage Book Stack}

I took a quick shopping trip to Goodwill to find some old books……the older and more beat up the better 🙂 I chose books similar in width and also looked for yellowing pages…..that will add to the vintage charm!

Remove book covers…..

You can peel back as much or as little of the binding as you’d like. The more you peel off the shabbier your books will look 🙂

This is the look I ended up with…..


Continue the same process with the other two books.

Next, you’ll need to gather your supplies. I grabbed some stamps and a brown stamp pad I had on hand, some embellishments like the vintage bookplate and some lace and twine. Feel free to use what you currently have.

Using your stamps or whatever you’ve decided to use begin embellishing the spines of your books.

Add your other embellishments with hot glue.

I flipped the top book over to the backside so I would have a blank page that I could use my larger vintage words stamp on and then I covered that with a thick burlap type ribbon that I had in my stash. Finally wrap your book stack like a gift with the twine.


And there you go….a gorgeous very vintage book stack to add to your decor, to use at a wedding or vintage party or shower, whatever you’d like! Hope you love it and as always make it a beautiful day!


Pretty Projects No. 5: Clothesline Frame with Mini Pennant

Different than your common clothesline frame I decided to add a bit more flair to it with my ‘little ones’ mini pennant:

This frame was originally gold then painted white and then finally spray-painted yellow. I used small eye hooks, picture wire and pliers.

 I screwed the hooks into the frame starting one-third of the way down because I knew that I wanted three ‘lines’ of photos. The second pair of screws went in halfway down and the third pair one-third of the way up from the bottom. Simply create a starting point and continue twisting and finish with the pliers until they are secure.

Next, thread the wire through the hook on one side and use the pliers to wrap it tightly and then thread through the corresponding side. I left my wire a bit loose across because I knew I wanted it to not look perfect, if you know what I mean 🙂

Simple as that! Now you can use any size clothespin you would like to hang your photos or postcards or whatever you plan to hang on your picture wire.

Now onto the mini pennant banner!!
Here are the supplies you will need: I printed ‘Little Ones’ out using my printer. The scalloped circle and mini flags were cut using my Silhouette. You can easily cut a thin rectangle out of scrapbook paper and clip the edges to resemble the little flags!

The rest is super simple! I folded the flags in half over the twine and glued them closed. I used my stamp pad to distress the edges of my mini flags and ‘Little Ones’ cutout.

Now using your clothespins clip your mini pennant banner to your picture wire on your frame. And your done…….ready to hang!

This creation went perfectly in our Master bedroom with the yellow accents and sweet pictures of our kiddos – it’s fun waking up to their beautiful ‘little’ faces 🙂

Make it a beautiful day 🙂

TDC Before and After
Bookmark and Share

Home Tour: How to Create a Living Room you love

If you remember me sharing my stripes inspiration here you’ll remember how much I used to loath my living room…….well, not at first when I designed it of course 🙂 When my style started to evolve from dark, warm, mid-2000 colors like dark green, gold and burgundy to light, cooler colors, I felt asphyxiated everytime I walked throught that room!
No one should feel that way when walking through their home……..if you do, it’s time to change! Now! Rest assured, I didn’t have a budget to make over this room……I just tried to sneak in a few things here and there using the current budget we have.


Here are the changes I made little by little:
Paint, paint, paint! We painted over the gold-green walls with a soothing blue-gray.


I bought two staple pieces from Craigslist (both under $200) to anchor the room and painted both of them white.

Read more here about how I transformed my ugly tree basket and here where I got inspiration for my gallery wall!

The green/gold curtains came down and up went my white/brown striped curtains {see before curtain pic above}

I moved the large sofa out! Since it’s small room and we don’t use it a whole lot I didn’t think we needed a huge sofa in there. Instead I kept the green chair and found the white Country Living chair at Savers ($15 people…..in good condition!) It can be done! The bench (also a score from Savers) can be pulled in for more seating if needed. Also our new roof isinstalled by Maui roofer. They have high-quality materials to make sureyour new roof will last for a very long time.

These changes took me months……..it didn’t happen overnight. But as the room started to come together I felt like it was becoming more and more ME!
Of course I needed a few new accessories…….

We seems to have more and more stuff. The junk removal service makes it easy to get rid of what seems like tons of unused items of all kinds of materials. Instead of having to figure out where to dispose of your old furnishings or other items and still pay to have them disposed bit by bit, let the junk people do the work for you. You will be surprised how affordable and how convenient it is. Call to get a quote and get ready to get rid of junk today.

You can read more here about how to create a tattered vintage book stack.

I love this room because it’s ME……..and the hubs likes it because I like it! Good man 🙂 I brought in colors, furniture, and accessories that I love because of the soft, light feeling they create.

I also put an air conditioner to this room installed by air conditioning Maui.


So, do you have a room you loathe? If so, I hope I’ve inspired you to start making the change to a space you love!
Make it a beautiful day!

Simple Typography Print Tutorial


I finished my family room gallery wall about a week ago but I still hadn’t found the perfect something to put into a frame with awkward dimensions – 5 3/4 x 11 3/4 – what is that? I contemplated getting a picture enlarged and cropping to fit the frame or framing a piece of patterned paper to compliment my color scheme…..hmmmm……Then while toodling around on Pic Monkey I decided I would make my own very simple typography print! I knew I wanted a black type on white look so I googled ‘white paper’ and clicked ‘Images’ and saved a piece of white ‘paper’ to my computer. You can use any color background you would like……simply google that color and save the image to your computer. 

Next, in Pic Monkey open the white paper file you saved. Here you will resize to fit the dimensions you would like. My funky dimensions in pixels was 431 x 881. If you would like to create a print to fit in an 8 x 10 frame you would want 600 x 750 in pixels. I used this handy calculator to convert my measurement from inches to pixels. Click ‘Resize’ and enter your dimensions. Be sure to unclick ‘keep proportions’ and then click ‘apply.’ 

 Now you get to enter your text! On the far left hand side click the icon that looks like a ‘P’, then ‘Add Text.’ You can play around with your font, color and sizing until you have a look you love. I didn’t get into all of the fun features and effects but I did add a little asterick for kicks. You can do the same by clicking the ‘Overlays’ icon, again located on the far left side. I chose ‘Stars’ and sized my shape for my print. Frame, hang and enjoy 🙂 

 I’ll share my gallery walll later on this week but here’s a little sneak-peak! 

 I hope you enjoy the tutorial! Have you used Pic Monkey to create your own print? I’m always learning and would love any tips or tricks you’ve learned!xoxo,